Send clients emails from your own mailbox: invoices, statements, notices. Emails go out from your address, and each one can carry its own file from the client card.
Where to find it
Sidebar → Marketing → Mailings, the right column One-off (scenarios are on the left). The latest 20 mailings are shown, the rest via Show all mailings. Each shows: subject, mailbox or service, status and how many emails have been sent. To send mailings, connect a mailbox: Mailboxes, or an administrator can connect a mailing service (Admin → Mailing services). No mailbox is needed then. Mailings are available to managers and above.
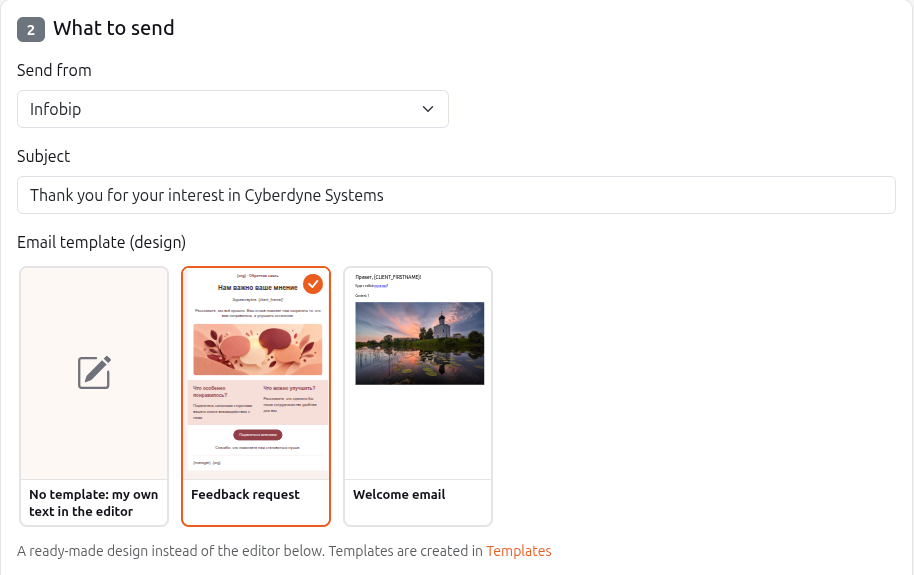
Recipients can be picked from a saved audience (clients and leads), and the email design can come from a ready-made template: the Email template (design) field on the What to send step.
How to send a mailing
- Click New mailing.
- Recipients. Tick the clients. You can filter the list by status, product and tag, or search by name or email. Clients without an email have no checkbox — nothing is sent to them.
- What to send. Choose Send from (your own mailbox or a mailing service), enter the Subject and the Email text. Use the Client name, Full name, Manager and Organization buttons to insert placeholders — in every email they are replaced with that client's data (for example, "Hello, {client name}!"). Placeholders also work in the subject.
- Files. Choose how to attach a file (see the next section), or leave No attachments.
- Click Create draft and review.
You can save the subject and text as a draft: Save as draft remembers them for the whole organization. Pick it later in the Draft list (the bin next to it deletes a draft).
The email design is chosen in the Email template (design) field: it shows cards with a preview of every template of the organization. Click a card to pick a template, or the first card to write your own text in the editor.
Files for emails
The file is taken from the client's folder: in the client card, on the Files tab, create a folder such as "Acts" and put a file in it. When sending a mailing, enter the folder name — for each client, the latest file in their folder with that name is used. This way each client gets their own invoice or statement.
Upload files in bulk
If the files are on your computer, choose Upload files in bulk and select all of them at once, for example all invoices for the month. HubNext matches each file to a client by its name, shows a table to check, and puts the files into the clients' folders.
- Enter the folder name (by default "Acts").
- Click Choose files and select the files.
- Check the table: each file shows the matched client and a status. If the client is wrong or not found, pick the right one in the list. Leave a file you do not need on — skip —.
- Click Save files and select clients. The files are saved into each client's folder, and those clients are ticked in the recipient list. The mailing continues in the "file from the client folder" mode.
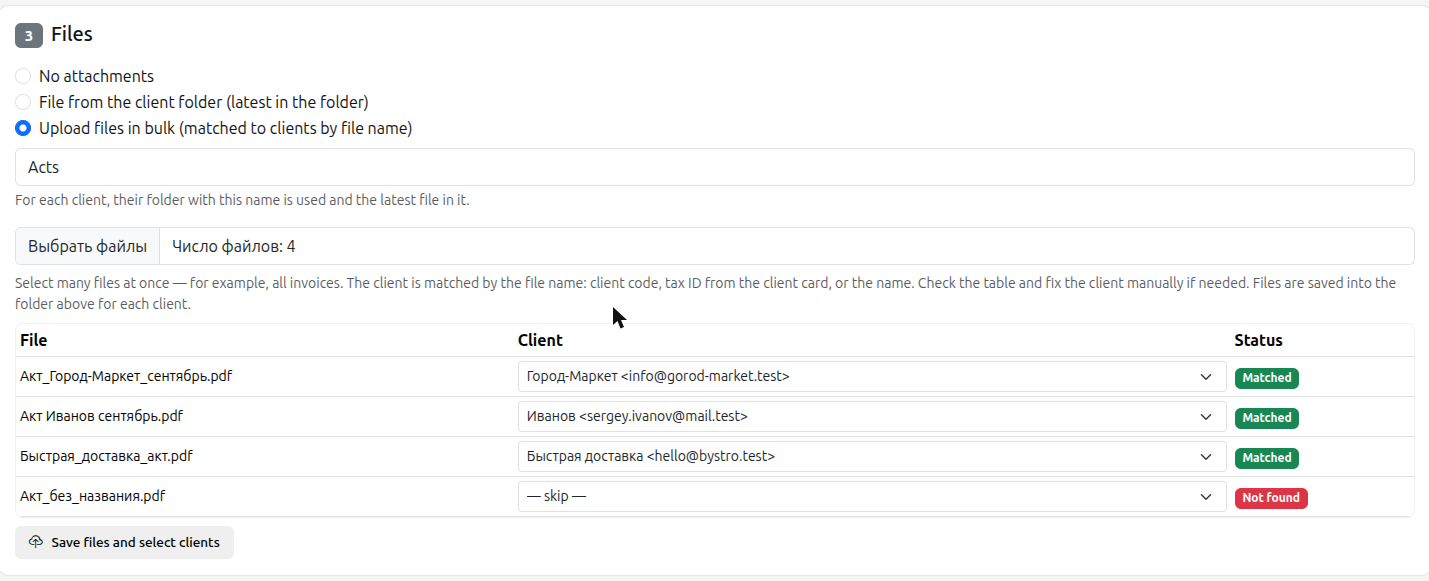
Statuses in the table:
- Matched — the client was matched automatically.
- Chosen manually — you picked the client yourself.
- Several options — several clients fit, choose the right one manually.
- Not found — no client matched. Choose one manually or skip the file.
- Duplicate — several files are chosen for one client. Keep one and skip the rest: you cannot save while there are duplicates.
How the client is matched
HubNext looks for the client in this order and stops at the first match:
- The client code in the file name (like
cll_1a2b3c4d). - The client's tax ID: the number from the client card (the "Tax number" field in the billing block) that appears in the file name as a separate number.
- The client's name in full inside the file name. If several fit, the longest name wins.
- The file name in full inside the client's name.
- A word from the client's name that occurs for only one client in the organization (for example, "Voyager").
Cyrillic and Latin letters are treated the same, so a file named "Акт Кочевник.pdf" finds the client Kochevnik.kg.
To let clients be matched automatically, name files after the client or add the tax ID: "Invoice_Voyager_Group_September.pdf" or "Invoice 301475698 September.pdf". A file named just "Invoice.pdf" cannot be matched, but you can assign it manually.
Which files can be attached
Common attachment formats work: PDF, Word (doc, docx), Excel (xls, xlsx), PowerPoint (ppt, pptx), images (png, jpg, gif, webp), archives (zip, rar, 7z) and text files. A single file can be up to 50 MB. A file of another format will not upload, and the reason is shown next to it.
Review and send
A draft sends nothing. The mailing page shows who gets the email and with which file: counters at the top, a table of clients below.
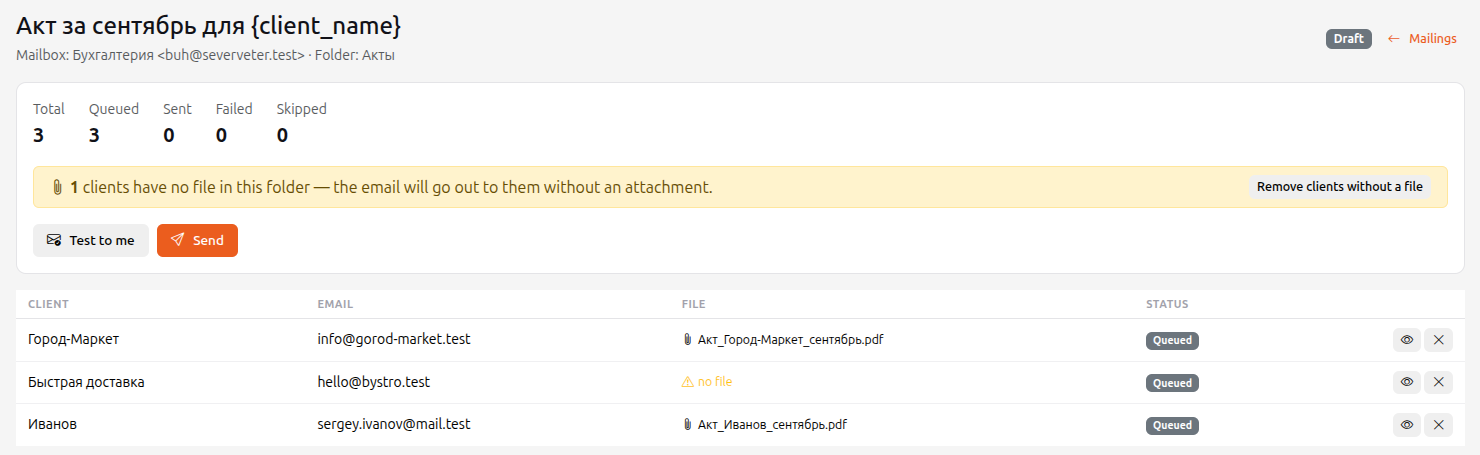
- The eye button opens a Preview of the email for the chosen client — with the data already filled in and the file name.
- If some clients have no file in the folder, a warning appears: they will get the email without an attachment. Click Remove clients without a file to exclude them.
- The cross next to a client excludes them from the mailing.
- Test to me sends the email to your address — so you can see it through the client's eyes. A test is required before the first mailing from a mailbox.
- Send starts the mailing after you confirm.
- If the subject or text still contains placeholders like
[STATUS]or[DATE AND TIME](this is how the system templates are marked), HubNext shows the list and asks whether to send anyway. It is usually better to go back and replace them.
Limits
- At most 500 recipients per mailing. For more clients, make several mailings.
- Emails go out one by one, with a pause of a few seconds, and no faster than your mailbox's Emails per hour limit (100 by default, changeable in the mailbox settings). This keeps your hosting provider from blocking the mailbox for mass sending.
- A mailing to 150 clients can be left alone — it finishes by itself, you do not need to keep the window open.
After it starts
On the mailing page the status of each client updates by itself: Queued, Sent, Failed, Skipped. For a failure the reason is shown (for example, a wrong mailbox password or your provider's limit exceeded). Click Retry failed to send them again, or Cancel to stop the remaining emails.
If sending is interrupted in the middle of an email, the client gets the Failed status with the note "sending interrupted, check manually". The email may still have gone out — before retrying, check your mailbox's Sent folder.
Unsubscribing from mailings
Every email address of a client, client contact and lead has an Email status: General (default), Subscribed and Unsubscribed. Change it in the card next to the email field (for a contact, in the edit window). Emails are not sent only to addresses with the Unsubscribed status: in a mailing or a scenario such a recipient gets the Skipped status with the reason "unsubscribed from mailings".
Emails sent through Infobip get an Unsubscribe from this mailing link at the bottom. If a person follows it and unsubscribes, their address automatically gets the Unsubscribed status and receives no more mailings. If you placed your own unsubscribe link in the text, it is not added again.
Languages in a mailing
If the chosen email template exists in several languages, every recipient gets the version in their preferred language (a field on the client or lead card). If there is no version in their language or the language is not set, the default version is sent.
- Under the template choice a Subjects by language block appears: you can set a subject for every language version. An empty field means the same subject as the default version (the main mailing subject).
- Below it you see which languages the email will go out in and how many recipients each has, plus a warning if some recipients have no version in their language.
- The email and the subjects are fixed when the mailing is created: editing the template later does not change an existing mailing.