A checklist splits a task into small steps. Each item can have its own assignee, so you can share the work in one task between several people and see what's already done.
Where to find it
Open a task — the Checklist block is under the description. Next to the title you see how many items are done (for example, "1/3"), and the bar below shows the progress.
Several checklists
A task can have several checklists with their own names — for example "Smoke", "Regression" or a separate list for testers. They are shown as tabs above the items; a tab shows how many items are done.
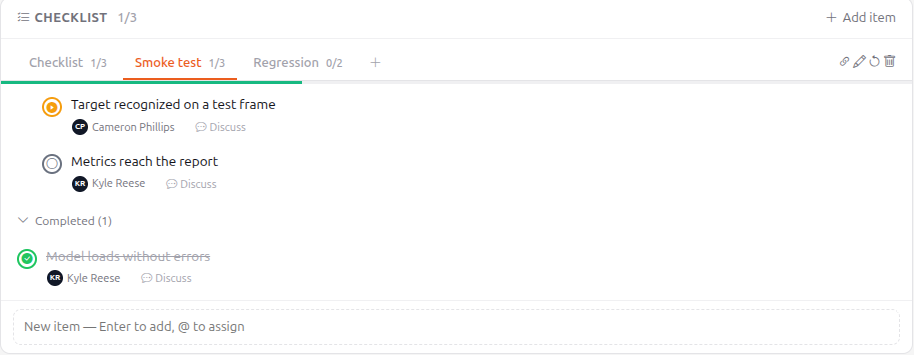
- + next to the tabs — create a checklist. Type a name and press Enter or Save. A checklist without a name is simply called "Checklist".
- Pencil — rename the selected checklist.
- Back arrow — clear the "done" mark on all items, so you can run through the list again.
- Trash can — delete the checklist together with all its items (you'll be asked to confirm).
- Drag a tab to reorder.
Link to a checklist
The Copy link button (chain icon) copies a direct link to the selected checklist. Whoever opens it lands in the task right on that tab. The link also shows in the address bar when you switch tabs.
How to add an item
Quickly: type in the New item field at the bottom of the block and press Enter. To assign the item right away, type @ and pick a person from the list. Without @, the item is assigned to you.
With details: click Add item in the block header. A window opens where you can add a description, due date, time and reminder.
Working with items
- The circle on the left cycles the item status: new → in progress → done.
- The assignee name under an item — click to assign the item to someone else.
- Click the item to open it and change the title, description or due date.
- Drag an item by the handle on the left to reorder.
- The trash can on the right deletes the item.
- Discuss — a short conversation about a specific item that doesn't clutter the task comments.
Completed items are not hidden: they are ticked and struck through, as in regular to-dos, and move to the end of the list. Only items that are not done can be dragged.
Who sees what
- Everyone with access to the task can see and change the checklists.
- Admins can create a private checklist: tick admins only when creating it. It's marked with a lock and visible to admins only; items in it can be assigned to admins only, and they don't appear in the task journal.
- The item's assignee is notified about the assignment. The item also appears in their Todos on the Tasks tab, where it's easy to tick off along with their other todos.
A short item description is shown right in the checklist, with clickable links. Handy, for example, for merge request links.
See also
The same checklist is available for deals, leads and clients, below their card. It works the same way.